Thursday, February 2, 2012

Love


Another quick one for today!  This is a super simple and fun Valentine’s Day card I made to show off my newly acquired skill of crocheting hearts.  I have been making a whole bunch of these cute crochet hearts in a ton of different colors.  If you know basic crochet stitches, these hearts are very easy to make and only take a few minutes each.  If you are interested in crocheting your own hearts, Skip to my Lou and Julia Crossland offer two great tutorials, which I used on my hearts.

As for the card, there is no stamping involved.  The sentiment was cut with my Silhouette Cameo.  The rest of the card was made with two dies.  Everything but the card base was cut from my paper scraps.  I am trying my hand at the CAS (clean and simple) style with this card.  I hope you enjoy it!  Thanks for looking.


Supplies:
  • Stamps: None
  • Paper:  PTI (White, Pure Poppy, Hawaiian Shores)
  • Ink:  None
  • Accessories:  PTI (Rickrack Border, Heart Border); Sentiment (love) Segoe Script Font cut with Silhouette Cameo; DMC Embroidery Floss #321 and #964; Craft Supply (button); Creative  Memories (corner rounder); The Twinery Baker's Twine (Caribbean). 

Wednesday, February 1, 2012

Anniversary Card


Here is a card I made for my Husband for our 13th wedding anniversary.  I cased this beautiful design by Amy Rysavy that I found on Pinterest.  I love everything about Amy’s card and for once actually had the same designer paper she used.   However, I decided to change up the color scheme since I felt the original colors were more suited for a Valentine’s Day card.  I used a variety of heart punches and heart images cut on my Silhouette Cameo.  Thanks for looking!


Supplies:
  • Stamps: PTI (Just the Ticket)
  • Paper: PTI (2008 Bitty Box Basics, Rustic Cream, Kraft); Echo Park (For the Record Background Text); Jillibean Soup (Dutch Mustard).
  • Ink: Colorbox Fluid Chalk Ink (Chestnut Roan, Pumpkin Spice)
  • Accessories: The Twinery Baker’s Twine (Cappuccino, Honeydew); PTI Ticket Border Die; Silhouette America (Ticket, Large Heart); Fiskars Punch (heart); EK Success Punch (heart); Unknown Company Punch (small heart).  

Saturday, January 14, 2012

Silhouette Cameo Tutorial


****Be warned that this is a very long post with lots of pictures and details!****

If you are all addicted to Pinterest as much as I am, you will have a bunch of pins with links to free printables.  I personally love the printable tags and cupcake toppers.  Most of these are downloaded in Adobe Acrobat format.  This is great if you want to print and cut by hand.  However, I was a lucky girl and received a Silhouette Cameo for Christmas.  I was curious if I could put my new machine to work and have it cut some of these items.  I have been using the Silhouette Studio (Designer Edition) software with my Cameo.  The problem is that the software does not support images in Adobe format.  My disappointment in that fact was quickly alleviated after a quick Google search.  Mind you, I am not very technologically savvy, so I was pleasantly surprised to learn that I could quickly change the format of the images I wanted with tools already available on my computer.  This information was completely new to me and has opened a wide range of possibilities for using my Cameo.  I thought I would do a photo tutorial to show exactly how I went about taking an image from one of my Adobe documents, converting it for use in my Silhouette Studio software, and finally making the image a cut file.
 
For this particular tutorial, I will be using a free printable template for an envelope liner from Papertrey Ink, available on their website here.  PTI also sells an A2 envelope liner die.  It is a lot more polished looking with its rounded corners and all.  This particular tutorial will only give you the basic shape available in their printable template, not the lovely look you get with their die.  Envelope liners really add a wonderful detail to your handmade cards, so I recommend using one whether you hand make one, purchase a die, or make your own cut file for an electronic cutter.  It is also a great way to use all that pattern paper we seem to collect. 

The shape available in the template is very simple and would be very easy to hand cut.  This shape could also be easily made from scratch in your Studio program, which gives you the added benefit of tweaking the shape even more.  Although this is a simple shape, the steps used can be applied to more complicated and detailed images.  So let’s get to it!

Go ahead and open the Adobe document that contains the images you want.  There are two very easy ways to convert images from an Adobe file for use in your Silhouette Studio.  The easiest way is to use your computer’s Snipping Tool.  If you don’t know what this is, look for it now (see photo below).  I just recently learned about this tool and now have it saved in my quick start menu.  I use it all the time.  Who knew?!?  For Window’s Vista or 7 users, you can locate this tool by opening the Start window and typing Snipping tool in the search area.  For Window’s XP or earlier users, I believe you can get this tool as a download from Microsoft.
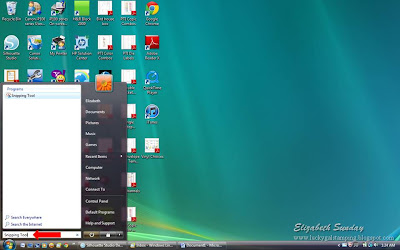
How to find Snipping Tool

Once the tool is open, it will prompt you to make a box around the image that you want.  Go ahead and make a box around the particular image you need, then another box will open with your snipped image.   
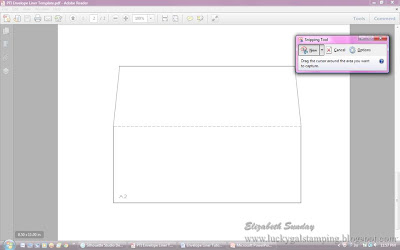
Snipping Tool Screen

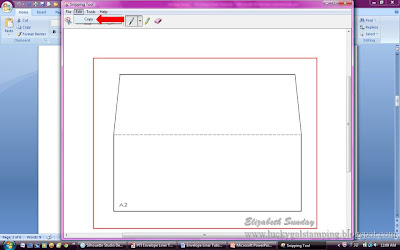
From here, you can either save the image or just copy and paste (my preference) in Studio.  The Snipping tool automatically converts the image to jpeg format, which is compatible with Studio.
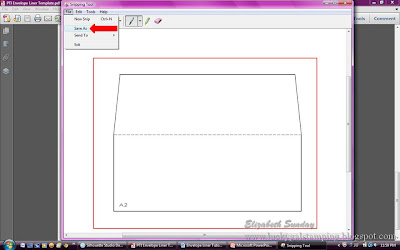
Save As (or)

Copy
If this tool is not available on your computer, you can just as easily use the Print Screen function.  When you have your document open and the full image on the screen, hit your Print Screen button.  Now open your Microsoft Paint program, which is usually found under accessories.  Use the Ctrl+V function to paste the image in the Paint program.  Save the file as a jpeg image.  All you need to do from here is open up the file in Studio.

How easy was that? 

Keep in mind that this is the very basic and easy option for converting the images.  Both of these functions are essentially taking a picture of a picture.  I have noticed that the image quality deteriorates a bit.  For line images it is not a big deal.  However, very detailed images or words do not appear as sharp and may not look as good if you are using the print and cut feature on the Cameo.  There are websites and other programs available that will convert the files for you.  I do not have experience with this and cannot offer any advice on the subject.  I figure for my use, the two methods listed above will be just fine.

Once you have your file opened up in Studio, you will have to do some work to make it a cut file.  If you cut the image as is, it would just cut a box around the image.  Your next step is to open up your Trace window and click on Select trace area.
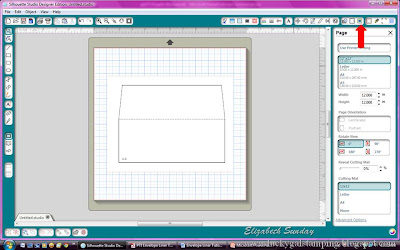
Opening Trace Window

Highlight your image as near to the image as possible, avoiding the outer edge of the original image.  Then select Trace outer edge.  You could trace the entire image, but this added several more steps to the process.
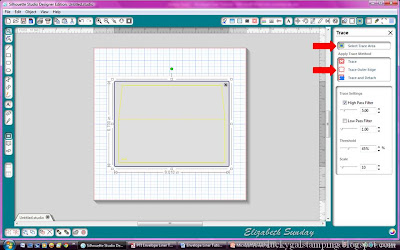
Select Trace Area and Trace Outer Edge

Next I moved the original image and lined it up next to trace image.  I used the original image as a guide for drawing the interior line.
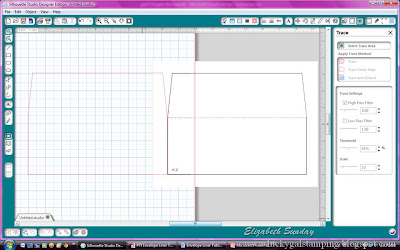
Moving original image and lining up with trace image

Use the Draw a Line tool and make a straight line on the interior of your trace image, lining up with original image.
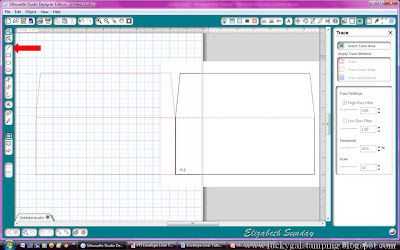
Drawing the interior line

This is an optional step.  You could just cut the outline of the envelope liner and use your score tool to manually add your score line after you cut it out.  Once that is done, you can delete the original image.  You are now working with the trace image.  Select the whole image and group the shapes together.
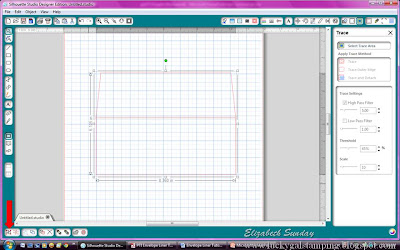
Select and group shapes

Now open the Scale window.  Lock the aspect ratio and enter in your desired dimensions.  In this case I used 5.50 for the width and the height automatically scaled to 4.015.
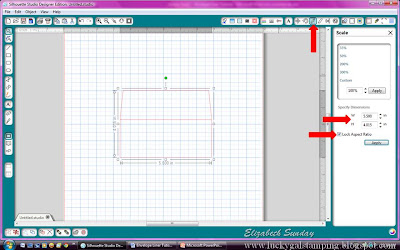
Open Scale  Window, Lock Aspect Ration, and set dimensions

Now select the whole image again and ungroup.
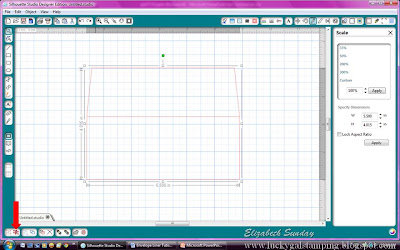
Ungroup Image

Open the Cut Style window.  Make sure your outer edge is set to cut.  Select the inside line and change this to perforate.  Another way of doing this is to have created a dashed line in your Line Style window when you created your interior line, then make sure all lines are set to cut.
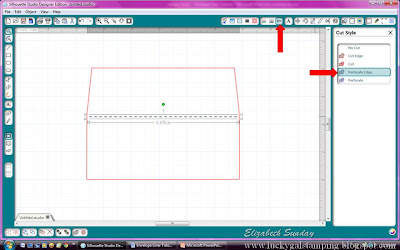
Cut Style Window and Perforating Line

Finally, select the entire image and group all shapes together again so you can place it on the mat where you need to cut.
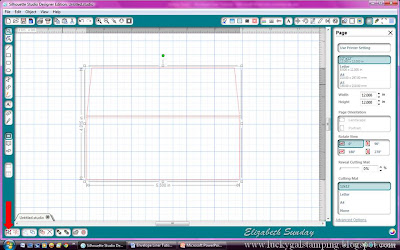
Group Shape

That is all there is to it.  Don't forget to save your work!  You are now ready to cut envelope liners for all your cards.  Once you know how to do this, it really does open a lot of possibilities for using images with your Cameo.  Just remember to follow the copyright policy set forth from the creator of the document you are using.  Happy Cutting!  

Wednesday, November 2, 2011

In the Meadow


Good afternoon!  I know it has been a long time since my last post.  I just haven’t been in the crafty mood lately.   However, I keep getting more and more new craft stuff to add to my stash even though I haven’t been using it.  I really just need to stop and use what I already have.  But who can resist with all the beautiful fall and winter stamps that have been coming out this year?  Thankfully, with the holidays rolling in, I am definitely getting more in the crafty mood.  I haven’t done much stamping, but have been helping my three year old daughter make some ornaments for her tree.  We have put together some simple holiday foam craft kits from the store, made some glitter ornaments, and paper snowflakes.  Next we will make the classic paper chain and some jingle bell bracelets.

As for stamping, I managed to make a card with my new Papertrey Ink (PTI) stamp set called In the Meadow.  This is one of the sets I was most excited to get.  I love the silhouette images.  I think this was the set that inspired me to finally break out of my crafting rut.  For my card, I did a simple brayer background.  This summer I took a wonderful class by Michelle Zindorf and learned so many great things including how to use my brayer.  I had one sitting around for many years, but only used it for smoothing paper together because I could never get my backgrounds to look right.  Well thanks to Michelle, I can finally get some real use out of my brayer.  You can check out her wonderful work here.  The background I did is actually really simple compared to some we did in the class.  So after doing the background, the rest of the card was as easy as using the companion die cuts for the In the Meadow stamp set.  The snow on the trees was made using a custom blend of white flower soft and three different types of Martha Stewart glitter.  By custom blend, I really just mean stuff I threw together trying to get a half decent snow look.  The sentiment is from PTI’s Think Big Favorites #8.  I hope you enjoyed this card.  I will try to make some more cards and not slack so much on posting.  

Thanks for looking!


Ingredients:

Stamps:  In the Meadow and Think Big Favorites #8, PTI
Ink:  Faded Jeans, Mustard Seed, Tim Holtz Distress Inks; Sky Blue Vivid Ink, Clearsnap; Onyx Black Versafine, Tsukineko; Summer Sky Memento Ink, Tsukineko; and Spring Moss, PTI.
Paper:  White, True Black and Kraft, PTI
Accessories:  PTI in the Meadow Die sleigh and snow drift dies; Flower Soft, Martha Stewart glitter, and Sakura Star Dust Pen.


Wednesday, May 25, 2011

PTI May Blog Hop


It is time for Papertrey Ink’s May Blog Hop.  The theme for this month is flowers.   I wasn’t going to participate, but had some last minute inspiration.  When I say last minute, I mean that I just made the card today.  It took me several hours of working on it in between feeding the kids, naps, play time, etc.   I decided to participate because I really wanted to try the trellis technique.  For a great tutorial on how to make the trellis, visit this site:  Valita's Designs.  One of my favorite things is a trellis covered with flowering vines.  Someday I hope to have one in my yard.  However, if you know me, you would know that I don’t like gardening.  I like flowers, but can’t grow anything if my life depended on it.  I very much have a black thumb.  The only flowers in our yard are due to my husband’s diligence.  Thank goodness for that.  If it were left up to me, we would probably have nothing but a sandbox for a yard.  At least I can’t kill paper flowers!  Well maybe I can…just keep reading after my picture.  So here is my card: 


Have you ever had one of those cards or projects that proves to be challenging just in the making of it?  This was one of those cards.  Between my inability to cut a straight and non-frayed edge with any of my paper cutters, finger prints, mystery smudges, exposed glue, smudged stamping, crooked impressions, and all the other problems with this piece, I am very surprised that I actually finished it.  So, I think that I can kill a paper flower.  I had to scrap a few due to some of the above listed issues.  Despite the problems, I still enjoyed trying this technique.  I hope you like the card.  Thank you for looking!

Ingredients:
  • Stamps:  Dahlia, Sending you sentiment, Polka Dot Basics II: PTI
  • Paper:  White, Kraft, Spring Rain, Argyle Socks PP: PTI
  • Ink:  Memento Tuxedo Black, Memento Dandelion: Tsukineko
  • Accessories:  PTI Cane Print IP; Mat Stack 4 Die, Double Ended Banner Die, Dahlia Die, Turning a New Leaf Die: PTI; Copics, Art Institute Glitter, Celebrate It Ribbon from Michael’s.    

Thursday, May 19, 2011

With Sympathy

Unfortunately, this card goes along with my last post. I mentioned that my MIL was having a difficult time. Her Mother had an accident which led to brain surgery. Sadly, after an exhausting couple of weeks in the hospital, her mother passed away. She was laid to rest this past weekend surrounded by a large group of loving family and friends.

I debated about posting this card because it kind of feels weird to post a sympathy card. However, I realize that we all need a sympathy card at some point in time. Unless made ahead of time, sympathy cards can prove to be very difficult to make. It usually comes at a stressful time when inspiration and creativity might not be easy to come by. I know this because I had to ask some very wonderful people on the PTI forum for some inspiration for get well and sympathy cards. Some great people responded with beautiful samples to draw inspiration from. Thank you to all those that showed their cards! After a lot of tinkering, this is the card I finally came up with:


I really like the way it turned out. I didn't want to use a lot of dark, dreary colors for this card. I used shades of grey, purple, and yellow. I really hope this card was able to give a little bit of happiness to my MIL during this difficult time. Thank you for looking!

Ingredients:
  • Stamps: Larger than Life, Tag-its #3, BB Retro, Daily Designs Sentiments from PTI.
  • Paper: Gray Cardstock Prism; Lemon Tart, Royal Velvet, Smokey Shadow, White, Argyle Socks PP from PTI; Silver Paper SEI.
  • Ink: Gray Whale, Bisque, Blackberry Clearsnap Fluid Chalk Ink; Tsukineko Brilliance Pearlescent Yellow.
  • Accessories: Ranger Silver Embossing Powder, Celebrate It Ribbon from Michael's, Martha Stewart Butterfly Punches, Crystals from Mark Richards, Fiskars Border and Circle Punch, Doily Die PTI.

Thinking of You, MIL

Here is a quick post for today.  This is a card I made for my MIL, who is going through a difficult time.   I wanted a subdued, but striking look to the card.  I hope I achieved this with the minimal embellishment and color combination.  Thanks for looking!


Ingredients:
  • Stamps:   Dandelion from Great Impressions; Mat Stack 3, Daily Designs, and Ribbon Tails (sentiment) from PTI.
  • Paper:  Ocean Tides, White cardstock from PTI.
  • Ink:  Fresh Snow Ink from PTI
  • Accessories:  Krylon Gold Leaf Pen, Celebrate It Ribbon from Michael’s, Gold pearls from Mark Richards, PTI Mat Stack 3 Die.

Monday, April 11, 2011

Celebrate

Here is a fun card that I made to have on hand for an upcoming occasion like a birthday or anniversary.  I really want to start making a stash of cards for various occasions, because I consistenly and notoriously send out late cards.  It usually gets to the point where I end up running out to a store to buy a last minute card.  How bad is that?  My hobby is making cards and I send out more store bought cards than homemade ones! 

I made this card to be unisex.  At least I think it could be used for a man.  I have never been great at making masculine cards.  For this card, I used one of my favorite color schemes, which is red (Pure Poppy) and black (Smokey Shadow).  I threw in some blue (Spring Rain) and white (Rustic White) for some added interest.  I used a lot of PTI stamps and accessories on this card, as well as my old Sizzix Star #2 die.

This is my first card utilizing one of the big card making trends going on right now.  I am usually late to the game when it comes to trends.  Well, I am finally jumping in and joining the baker's twine trend.  I just received a sampler pack I ordered from the Twinery.  It contains 15 yards each of 11 different colors.  Check this out:


I went with the sampler pack because I didn't want to invest in a large spool of twine in one color.  For me, the sampler pack is perfect.  I get to try a lot of colors for a small price.  The colors are so pretty. I couldn't help myself.  I had to find a way to use some on this card.  Don't be surpised to see twine on a lot of upcoming cards.  It only took using it one time to fall in love with the stuff.  Now I see why it is so popular.   

Now that you endured my ramblings, here is my card:


I hope you enjoyed this project.  Thanks for looking!


Ingredients:
  • Stamps:  All Stamps PTI: Mat Stack 1, BB-Gingham and Newsprint
  • Paper:  Pure Poppy, Smokey Shadow, Spring Rain, Rustic White, DP from DCWV
  • Ink:  Memento Tuxedo Black, Clearsnap Colorbox Fluid Chalk in Lipstick Red
  • Accessories:  Sizzix Stars #2 die,  PTI 1 3/4" Limitless Layers Die, Mat Stack 1 Die, Spellbinders Label Die, PTI Canvas Impression Plate, Mark Richards Crystals, Charcoal Bakers Twine from the Twinery.
*Twine picture from the Twinery website*     

Tuesday, March 29, 2011

Egg Hunt

Wow!  It is really amazing these days when I am able to get more than one card completed in a week, let alone a month.  I managed to make another card this week because I really liked the sketch from Crazy 4 Challenges this week.  I thought I would make some kind of Easter card for this challenge.  I really love the stamp I used from Serendipity Stamps.  They have the cutest Easter stamps!  This card definitely gets me excited for Easter and taking my daughter on her first Easter egg hunt where she will actually understand and look for the eggs.  I can't wait for that!  I hope everyone reading this has a Happy Easter.  Thanks for looking.

Here is the sketch from Crazy 4 Challenges:


Here is my card:


Ingredients:
  • Stamps:  Serendipity (Main image); PTI (Sentiment and Sentiment Frame)
  • Paper:  PTI Cardstock, Imaginisce DP
  • Ink: Memento Tuxedo Black, Rich Cocoa, Cantaloupe, and Copics
  • Accessories:  Stickles, Crystals, Spellbinder's Nestabilities


Friday, March 25, 2011

PTI March Blog Hop a little too late!

Well I had intended to use this card for the PTI March Blog Hop, but didn't finish with the card, pic, and blog entry until too late.  Two minutes too late to be exact.  That is what happens when you have an unexpected vehicle problem and then have to deal with a baby and toddler!  I also made this card based on this week's SCS Card Sketch Challenge #325.  For the blog hop, we were challenged to use embroidery floss in a fun and inventive way on our project. This could include stitching, wrapping it around and tying it like ribbon, braiding, accenting tags, embroidered patterns or anything else we could come up with.  I don't think I did anything very inventive.  I just embroidered the stem of my center flower.  Sorry for the photo quality.  My digital camera broke and my husband took this picture on his Blackberry.  I am not very good with photo editing programs, so I couldn't make any adjustments.  Thanks for looking!


Ingredients:
  • Stamps: PTI Flower Fusion 1 & 2; BB Gingham
  • Paper:   PTI White, Spring Rain, and Plum Pudding CS; HOTP Paper Pizzaz DP
  • Ink: Colorbox Fluid Chalk ink in Lime Pastel, Lavender, Wisteria, and French Blue
  • Accessories:  PTI Wood grain Impression Plate, PTI FF 1&2 Dies, Beautiful Blooms II #1 Die,  PTI Button, DMC Embroidery Floss, Felt from Michael's, Jolee's crystals, corner rounder and Spellbinders Nestabilities.  

Thursday, February 17, 2011

It has been a while!

I can't believe how long it has been since I last posted anything.  When I started this blog, I intended to make regular entries showing my paper crafts.  However, I got side tracked with several things and have not made any projects for a while.  My biggest obstacle to making anything has to do with the fact that I have a very active 2 year old girl and I just had a baby boy in December.  My kids keep me very busy, to say the least.  I always want to work on my crafts after they are in bed, but I am usually too exhausted. 

Secondly, during the past summer, I decided to start on the massive undertaking of unmounting all my stamps.  For those that have gone through the process, I am sure you know my pain!  I intended to unmount all my stamps, remount on EZ Mount, stamp an index file, and finally store them in binders separated by category.  I planned to complete all this before the baby arrived!  I would say that I am approximately 95% done with the unmounting.  However, I have not remounted on the EZ Mount.  So right now, the majority of my stamp collection is stored in envelopes inside a very large storage tub.  Since I have not sorted into categories and have not stamped an index file, I really don't know what I have and where to find it.  I got burnt out during the unmounting process and stepped away for a while.  The problem was that I didn't get back to it before the baby arrived.  Now I don't seem to have the time.

I really wanted to reorganize my stamp system because I had way too many wood mounted stamps and no where to store them.  I had outgrown my previous stamp storage a while ago and just had bags and boxes of stamps everywhere.  I couldn't find a stamp without rummaging through tons of stuff.  My husband and I also did a massive overhaul of our bonus room/office.  Our craft area was previously in our bonus room.  We decided to turn the bonus room into a play room for our daughter.  We then turned the office into our craft room.  We totally splurged and purchased a ton of pieces from Scrap N Cube to organize our new craft room.  We couldn't be happier with the products!  Once I get rid of the clutter of my unmounted stamps, I will take and post some pictures of our craft room.

So now that you know why I haven't posted any projects for a while, let me get to the point.  I finally got a card done.  It only took me three days of trying to work at night after the kids went to sleep.  I needed a thank you card for a baby gift.  This is what I came up with.  I hope you enjoy it.  Thanks!


I stamped the leaf background with Papertrey Ink's (PTI) Turning a New Leaf set in brown ink.  I then stamped more leaves in green ink, cut them out, and adhered them with Pop Dots.  I made the accordian flower from patterned paper.  The center of the flower is a punch from an old book and sprayed with Smooch Spritz. The button is tied with twine. 

Ingredients:
  • Stamps: PTI, Sentiment stamp unknown
  • Paper: PTI,Kraft CS; Prism, Brown CS; DP, Bo Bunny
  • Ink: Clearsnap Colorbox Chalk ink in Dark Brown, Colorbox Pigment ink in moss Green
  • Accessories: McGill, Flower and tag punch; SU scallop border punch; Clearsnap Smooch Spritz; twine; PTI button.

Tuesday, April 6, 2010

MOJO133~Daffodils

There is another great sketch this week at Mojo Monday.  I haven't had time to participate in the challenges recently, but I really like this week's sketch.  So I burned the midnight oil last night and made a card.  I hope you enjoy!
\
,


My stamped image is from Serendipity stamps.  I colored the image with Copic markers and cut it out with an oval nestability.  While the image was still in the die, I sponged on Sand Memento Ink.  I layered the main image on larger scalloped ovals and added some crystals.  The decorative border was done with my new Martha Stewart border punch.  Oh how I love those punches!  I also lighly sponged on some silver Colorbox metallic ink to the border design to bring out the soft grey in the background designer paper.  However, I don't think it really shows up in the picture.  The ribbon was originally white and then colored with a Copic marker since I didn't have any ribbon to match.
 
Copics used: Y21, Y23, Y26, YG95, YG97
 
Ingredients:
  • Stamps: Serendipity
  • Paper: Prism, GKD, Cosmo Cricket DP, SEI DP
  • Ink:  Memento, Copics, Clearsnap Colorbox Metallic Ink
  • Accessories:  Jolee's hotfix crystals; Recollections pearls; Martha Stewart punch; Corner rounder; Celebrate It ribbon from Michael's; Bow Easy
 
Thanks for looking!
 

Saturday, April 3, 2010

C4C31~Herd it's your birthday!

This is a variation of a card I made for a class I taught at my LSS, Loving Hands Creations. I was about to post the card when I realized that it fit in with this week’s challenge over at Crazy 4 Challenges. The challenge was to make a card using kraft cardstock as the base. I started with the kraft base and used a Cuttlebug embossing folder to give it extra texture. Unfortunately, I don’t recall the manufacturer of the sunflower designer paper. This was paper I found in my stash from a couple years ago. The paper was not marked, and it was before I realized I should label my papers with the manufacturer. The black designer paper is from Die Cuts with a View. I colored the cow stamp with Copic Markers. For the background, I sponged on blue and green distressed ink, and then added some blades of grass with the markers. I used Pop Dots to adhere the cow to the background. The sentiment was computer generated and printed onto the kraft cardstock. I sponged the edges of the sentiment tag with Sand Memento Ink.


Copic Markers used: N5, N7, N9, C0, R20, YR01, E40, E31, E33, E35, Y21, Y26, Y28, BV31

Ingredients:
-Stamps: High Hopes; Computer generated sentiment
-Paper: PTI Kraft; GKD; DCWV
-Ink: Memento Tuxedo Black; Copics; Tim Holtz Distress Inks
-Accessories: Copics; Nestabilities; Ribbon, American Crafts; Buttons, Joann’s; Inkksentials Pen, Ranger; Brads, Spare Parts; Embroidery Floss, AC Moore; Pop Dots; Cuttlebug Embossing Folder; Bow Easy.

Wednesday, March 24, 2010

Thinking Winter!?!

Since I am sitting here at the lodge at Peak n Peak ski resort, I have snow and winter on the brain.  Well, there isn't really any snow on the ground, except for the slopes.  Only half of the slopes are open, but it made for a good day of skiing.  The temperature hoovered around 50 degrees and there were no more than about 50 total people skiing the 20 open slopes.  It made for a nice, relaxing day of skiing.  Anyway, this got me thinking about winter and Christmas cards to make for next season.  Then I realize that I never got around to posting one of my cards from this past season.  It happened to be one of my favorite because it was the first card I made using the Basic Grey Eskimo Kisses line of papers I had just purchased at the time.  I love Basic Grey papers in general, but I especially love the Eskimo Kisses papers.

Here is that card:


Ingredients:

  • Stamps: Artful Stamper, Sentiment PTI

  • Paper: Basic Grey, Prism, GKD

  • Ink: Memento Tuxedo Black, Copics

  • Accessories: Ribbon, American Crafts; Buttons, PTI; Glitter, Art Institute; Label Punch, McGill

Enjoy!

Monday, March 22, 2010

Welcome!

Welcome to my blog! After much consideration, I decided to create a blog as a way to track and share my papercraft creations.  I purchased my first rubber stamp approximately 15 years ago.  At the time I only purchased the stamp because it was an image of African Violets, which happened to be my sorority flower.  I never used the stamp because I really didn't know what to do with it.  Little did I know that little purchase so many years ago would become my favorite activity...well more of an obsession.  After that initial purchase, I didn't explored rubber stamping any further until about 2002.  At the time, I was visiting my friend and noticed a basket full rubber stamps.  She was gracious enough to show me how to use them.  I was amazed at what I saw.  From that point on, I haven't looked back (much to my Husband's dismay).

I don't consider myself a creative person.  As much as I love rubber stamping and other paper crafts, the creative process does not come naturally to me.  I am still learning and searching for my style, but love every minute of the process.  So I hope you enjoy this creative journey with me.  Please be patient while I develop my blog since I am a newbie and still figuring this blogging thing out.

Now to my first creation:


I made this card for a product demo I did at my local stamp store, Loving Hands Creations, for one of their open houses.  I was demonstrating using Clearsnap Fluid Chalk Inks.  I created the sky background by using the Clearsnap Stylus tool to sponge Ice Blue ink on the paper.  I used a torn paper towel as my mask to create the clouds.  I have seen this technique done using various masks, from scalloped edged paper to acrylic pieces made specifically for this purpose.  However, I find that torn paper towels gives a more natural look to the clouds.  Next, I sponged on Lime Pastel and Olive Pastel for the grassy area.  On a separate piece of paper, I stamped the flower image from Artful Stamper with Blackbird ink.  I used the stylus tool to color the petals with Wisteria, Lavendar, and Blackberry.  I used Butterscotch and Bisque for the flower center.  I used the same greens from the grassy area on the flower stem.  I cut the flower out and adhered it to my background.  I stamped the sentiment from Great Impressions with Charcoal.  For the card base, I used Prism cardstock (embossed with Cuttlebug Swiss Dots folder) and Cloud 9 Designs DP.  The ribbon is American Crafts.  The crystals are from Mark Richards and glitter is Stickles.  

Please enjoy!